Part 1 – Part 2
In part one of this series on How To Build A Listening Room, we focused on room size. Starting with the correct room size is critical and sets the stage for the type of acoustical issues you must deal with down the road. Part two focused on positioning of your speakers and listening position. With a two channel system, there is a position for your speakers that will compliment the room’s size and volume. In part three, we will focus on low, middle, and high frequency room acoustical treatment to minimize reflections at the listening position and to manage low frequency resonances.
Low Frequency Issues
Low frequency issues should have been minimized if we followed the steps listed in part one. However, real estate is expensive and we must sometimes compromise on the dimensions that we really need. To really go after low frequency issues and the resonances that low frequencies produce, we need to make the room larger. We need a larger width, length, and height. Since that is not usually an option, we must go the other way and make the room smaller. We must make it smaller by installing low frequency pressure producing technologies.
Axial Modes
Low frequency energy issues are found mainly in the axial modes. An axial mode is the energy that occurs between two parallel surfaces. It is the energy that resides between the floor and ceiling, the two side walls, and the two rear walls. It is the most powerful of all the modal resonances. This is where our low frequency absorption technology must be positioned. We must have it in every corner and along the two shortest wall dimensions that we have. If the room is 15′ wide and 19′ long, we must have the low frequency absorption placed along those two short walls. We can not use foam or tubes filled with building insulation. We must use diaphragmatic absorption.
Diaphragmatic Absorption
Diaphragmatic absorption is pound for pound, the most powerful and absorptive low frequency technology one can use. It can be made to absorb across a broadband of frequencies or it can be made to absorb at certain frequencies. A diaphragmatic absorber has a front wall or two front walls that slow the low frequency energy wave down. Once it is slowed down, it can enter the inside of the cabinet and be absorbed depending on the internal cabinet fill material. Mineral wool, building insulation, and fiberglass are traditional fills but activated carbon or charcoal gives you the best performance to size of cabinet ratio.
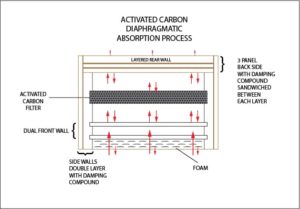
Activated Carbon (charcoal) Diaphragmatic Absorption
Quantity Vs. Quality
How much low frequency absorption do we need? This depends on room size and volume. The smaller the room, the more one needs. Only by taking frequency response measurements within the room after the low frequency diaphragmatic absorbers are in place with tell the story. To impact the frequency response curve of the room, will require at least both sides of our 15′ width to be treated with absorbers. From that start point, one can add or subtract units based on the room’s attack and decay times in frequencies below 100 cycles.
Room Surface Reflections
Reflections from our room wall surfaces intermix with the direct sound from our loudspeakers. The direct sound is the sound that travels in a straight line from our speakers to our ears. This wanted direct sound is the purest sound quality our system can produce. Once the room wall reflections enters the direct sound, we now have direct and reflected energy mixed together. This is not a bad thing. We want both direct and if you will indirect sound for more realism and lifelike presentation. The sonic goal is to find the correct balance between room sound and direct sound.
Reflections Produce Spaciousness
Our reflected energy from our side walls is critical for the impression of spaciousness in our sound stage presentation. We do not want the reflections from our side walls arriving at our listening position “ahead” of the direct sound. We want to delay the reflections from our side walls, so that they arrive after the direct sound by a time frame of 15 milliseconds. This small time delay will add spaciousness and assist us in creating our sound stage.
Sound Absorption Technologies
To achieve this small time delay, we can use absorption or diffusion technologies. For the sake of this discussion, we will use absorption. The market is full of sound absorbing panels and choosing the correct one should not just be a matter of price and convenience. One must choose a panel that has the proper rate and level of absorption that will treat all the important frequencies with equal respect. We need absorption technology that does not over absorb or under absorb at any frequency below 500 cycles. Why 500 Hz. or lower? Because this is the region where all our vocals occur and our vocals are what provides the emotional connection we all seek from our music and sound stage presentation.
Acoustic Foams
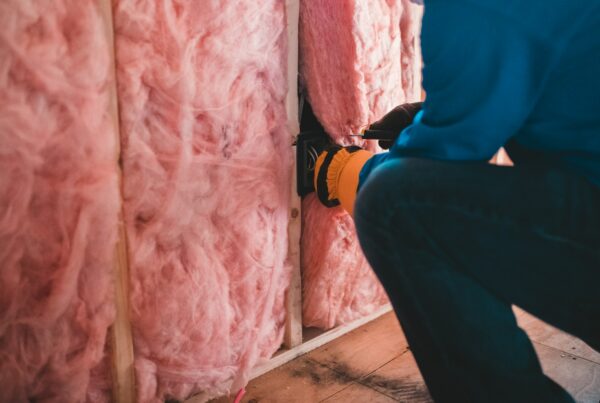
Acoustic foams are popular treatment options and most work well above 500 Hz. The real test of an acoustic foam is how well it works below 500 cycles. Most acoustic foams absorb very little at 125 Hz. and absorb a little more at 250 Hz. This frequency region is the true test of a foam. Do your research and find a foam that has a smooth response curve below 500 Hz. with a gradual but smooth absorption rate and level.
Part 4: Diffusion And Electronics
In part 4, of How To Build A Dedicated Listening Room, we will discuss the other room surfaces such as ceiling and front and rear wall of our listening room and their overall impact on our sound stage. We will also discuss the electrical requirements for our system so that we are not introducing more “noise” into the room. That we don’t need. We have enough “noise” just dealing with the room boundary surfaces with reflections and low frequency resonances.
How to build a listening room part one
How to build a listening room part two
How to build a listening room part four
I hope this explanation helped. If you would like a free analysis of your current room plans, please complete the form on this page www.acousticfields.com/free-acoustic-treatment-room-analysis-tell-us-about-your-room/ and we will run a free analysis for you. Please leave any comments below so I can get back to you. Don’t be afraid to hit those Facebook like, Google+ and Twitter buttons on the left hand side so other people can see this post. And if you want to learn more about this subject please sign up for our free room acoustic treatment videos and ebook which provide step by step instructions. Get instant access by signing up now.
Thanks
Mike


Where on your site can I purchase the activated charcoal for a subwoofer trap?
Send us an email to info@acousticfields.com