Acoustic Foam
There are many companies that offer acoustic foam as one of their products for sound absorption in our home theaters, listening rooms, and professional recording studios. Acoustic foam is offered in different thicknesses and many different colors. Some companies offer different shapes of foams. We have triangles, squares, and even some foams with different surface configurations that are claimed to add diffusion properties to their foam products. Whether they diffuse or not, the appearance of any foam is not attractive and does not compliment a studio or home theater decor.
Foam Cabinet
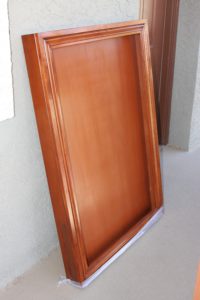
To change the appearance of what ever foam we are using, we can make it look much more presentable without hindering any of its absorption properties. You can do this by building a cabinet to put your foam in. It is like a plexiglass, shadow box that is used to place art work in only it is not made of plexiglass. You can build a cabinet for your foam to fit into. The cabinet can be made out of solid wood or any other material you would like to compliment your room finish with. You can build a piece of furniture.
Fabric Face
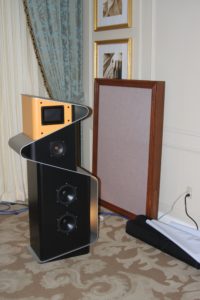
Across the face of your cabinet, you can use an acoustically transparent fabric. There are many acoustical fabrics out there and choosing one with the color scheme and pattern is relatively easy. Just make sure the fabric has an air permeability to it. To determine this, you can blow smoke through the fabric from a distance of one foot and observe how much smoke goes from the region of higher concentration, your mouth, to the other side of the stretched out fabric. If you get an 85% smoke pass through, you are good to go with that particular fabric.
Carpentry Skills
Building a foam cabinet requires basic carpentry skills. A table saw is best to cut the pieces. If you do not have access to a table saw, a hand held power saw will work. Just make sure you cut a straight edge. If you are using 2″ foam to go inside your foam cabinet then the cabinet needs to be deep enough for the 2″ foam and also allow for at least a 1/2″ gap or air space between the fabric and foam. A cabinet that is 3″ deep should suffice for any foam depth requirements.
Cabinet Size
Most foam comes in 24″ x 48″ pieces, but you can build your cabinet in any size that fits your needs. Remember, the foam will be inside the cabinet and not seen, so taking existing foam and cutting it to fit into your cabinet is not an issue. You could even make you cabinet large enough, say 48″ wide to accommodate two pieces of foam, laid side by side. Cabinet widths greater than 48″ are to be discouraged because fabric widths may not be available to cover larger size units and stretching fabric across longer distances is not welcome.
Fabric Attach Method
Attaching the fabric to the cabinet must be done in a certain manner to insure that the fabric is taunt enough without stretching. Attaching it to the cabinet involves two people. One person holds the fabric into position, and the other staples it to the cabinet using a hand or air driven stapler. A tacking strip is placed over the fabric, so the staple can grab the tacking strip first before it goes through the fabric. This method provides even pressure distribution across the fabric surface area.
Stretch And Staple
To cover the face of your cabinet with fabric, attach the fabric to one side of the cabinet with the tacking strip and staples. Pull the fabric across the foam cabinet and attach it to the opposite side using the tacking strips and staples. Repeat this procedure pulling the top across and securing it and then the bottom. Trim all excess fabric from foam box edge.
Frame Assembly
The frame assembly will go over the foam cabinets front edges to cover the fabric, tacking strip, and staples. A 1″- 3″ wide frame can be used. Since your foam cabinet is 1/2″ thick, you can secure the frame to the cabinet edge. You will have to build up spaces every few feet to secure and provide the necessary backing to support wider frames.
Installing Techniques
The foam cabinet can be hung using standard picture hanging techniques. Two female loops can be secured to the cabinet back and wire threaded through. Adjusting the wire length, will enable you to raise or lower the cabinet’s position or will allow you to install the cabinet with a forward lean to aid in reflection control and management.
Component Furniture
Building a foam cabinet will allow your room acoustic treatment to look like the rest of the decor in your room. Most acoustic open celled foams are not attractive and building a solid wood cabinet with fabric across the front is a good way to keep the performance of the foam and have it in an attractive piece of furniture. Stains and paints can be used to finish the cabinet and numerous fabric colors and textures are available to compliment any decor.
Build Drawings With Instructions
If you would like to build the unit’s yourself, but do not know where to start, you can find build drawings, assembly instructions, with actual step by step build photos, cut sheet, material, and required tool list. We can also assist you with foam and fabric. The DIY acousitc panels are available to buy as build plans here.





Hi Mike,
I simply love your expert advice and all matters related to “Sound”.
It turs into beautiful Music whether for real setup or knowledge.
Simply awesome. I love it.
J, Thank you for your support.