Today I want to discuss the recording studio design principles you need to adhere to if building a new recording studio. There’s a whole series of issues that we need to approach. Technology and process have improved and we have updated this blog to reflect those changes on 05 / 09 / 21. Let’s start with the basics.
Top 7 recording studio design principles you must follow
1. Room dimensions:
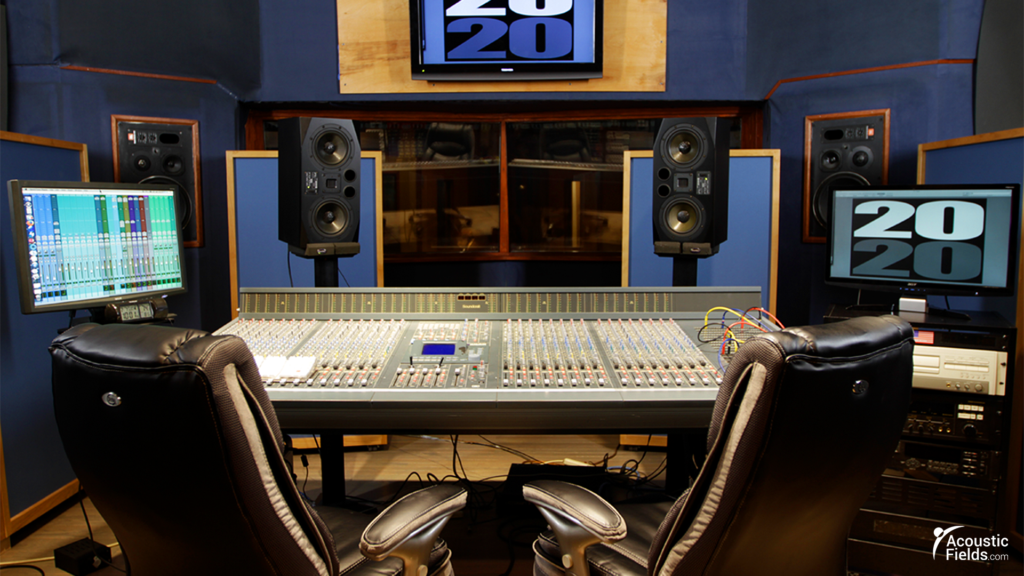
Length, width, and height. All of these dimensions are critical if you’re going to minimize the issues in the room and there are lots of issues you need to address. Selecting the right dimensions for your room is critical. The correct balance of ratios will go along way to reducing the low-frequency issues within your room. Fewer issues created by proper ratios will result in less material and labor costs.
2. Low-frequency management:
This issue correlates strongly with room dimensions. Low-frequency issues are something that all small rooms have to deal with and you have to deal with them correctly because if you don’t you’ll be working around them for the whole project. Low-frequency issues can smother and blur middle and high-frequency energy. When you are considering music studio design or recording studio design, you must make low-frequency management a top priority.
Recording Studio Design Service
Every recording studio has unique acoustical challenges. Acoustic Fields is your partner with over 25 years of experience, helping you to design a recording and mixing environment that takes the room sound out of the equation.
3. Reflections versus Direct Energy:
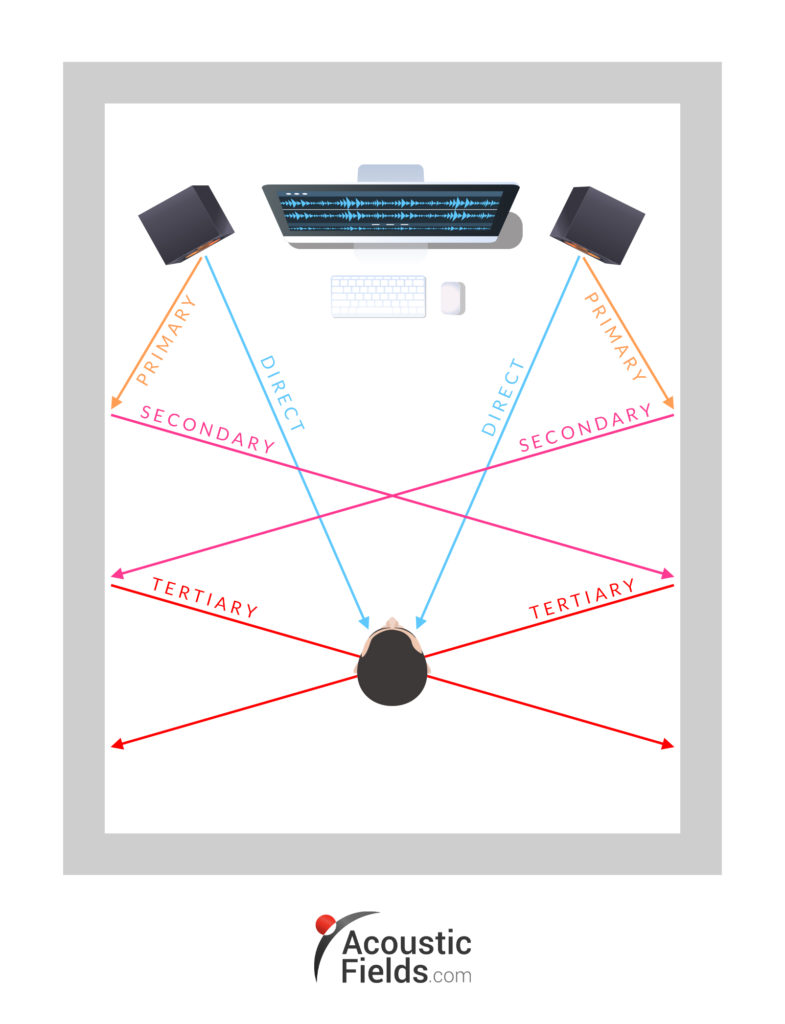
This is the wanted direct energy, the straight-line energy from your speakers versus the reflected energy from the room. The straight-line energy from your speakers to your ears has the least amount of room distortion (reflections). You must strike a balance between straight-line energy and room reflections. The acoustic goal is to achieve the resolution you receive from near field listening and expand that resolution out over a wider sound stage.
4. The frequency response of the room:
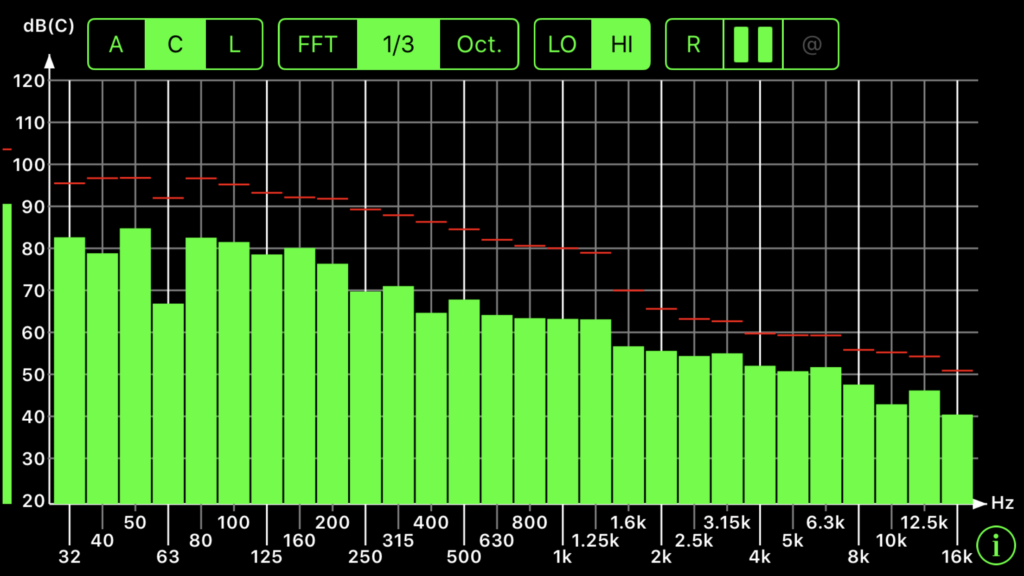
This is a picture of how the room handles energy at all frequencies. A frequency response curve will show us where our problems are and how large they are. A response curve will also help us locate which surface area is causing the problems. We have axial which is two wall issues, tangential which are four wall issues and then finally oblique which cover all six surfaces within our rooms. Axial modal issues between two parallel walls are the largest problem when it comes to low-frequency management.
5. Reverberation times:
Reverberation is the summation of all the reflections from the wall surfaces. It is room distortion. The walls, floor, and ceiling are all offending surfaces. We must locate the surface areas that are contributing to higher reverberation times. We must locate the surface areas that produce the most reflections at our listening or monitoring positions. We must assign the correct treatment type and amount to those surface areas.
6. Monitor size versus room:
Large speakers in small rooms are not a good match. Lots of energy in a small room with poor room dimensions causes many issues with our frequency response. Larger speakers exaggerate the low-frequency issues by placing too much energy within the room. The room dimensions will not allow for that energy to “breathe”.There’s a balancing act between the size of our speakers and room size. I made a separate video on this issue which you can see here.
7. Sound treatment:
People confuse sound treatment with noise management issues all the time. Acoustical treatment is for issues that occur within the room. These are low-frequency issues that cause bass “boom” and are related to room modal pressure issues. Reflections from the wall surfaces also add to higher reverberation times which is one form of room distortion. Pressure and reflections are the two things that we use acoustical treatment for. They have nothing to do with barrier technology or keeping noise that’s generated from the inside and noise that’s generated from outside the room, outside the room. Here is a blog and video on this very issue which you can see here.
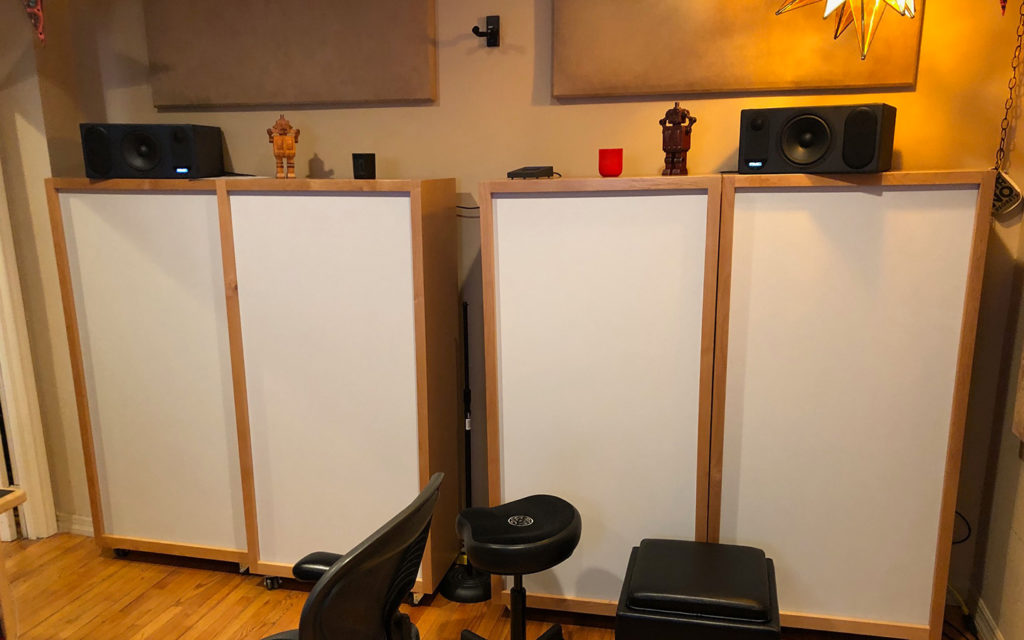
So we have a lot of variables that we need to consider when it comes to adhering to correct recording studio design principles. One of the biggest issues from these principles is working around the room modes that we see.

Recording Studio Design Service
Every recording studio has unique acoustical challenges. Acoustic Fields is your partner with over 25 years of experience, helping you to design a recording and mixing environment that takes the room sound out of the equation.
Managing low frequency energy is critical
People are always unhappy with the way their room is handling energy, especially low-frequency energy. They do not know what to do or even where to start. They read about putting products in the corners of their rooms when the problems they are experiencing are caused by the whole wall surface. They do not know what type of treatment to use, how much of that treatment type, and where to put the treatment. Their frequency response curve shows issues at 80 Hz. but they don’t know which wall surfaces are causing the problems and how much and what type of treatment to use. The bottom line is you shouldn’t be working around room modes. The room should facilitate what you’re trying to accomplish acoustically in the room.
Directed Vs. Reflected
Direct versus reflected energy. The direct is that straight-line energy from your monitors. That’s the music only, what’s in the mix, and obviously the reflected energy from the sidewalls is the room itself. We have this balance between direct versus reflected energy. This is called critical distance which is a very important variable to take into consideration when we’re looking at recording studio design principles. There are some physical positions within the room that smooth out frequency response and balance the direct with the room sound.
Image Shift
Image shift is another room dimension issue. If you’re working around uneven distances between your sidewalls, between the left and right channel speakers, your image is going to be pulled to one side or the other depending on the distances. Distances that are uneven between the speakers and the sidewall and distances from the listening position or monitoring position to those speakers themselves. Distances that are not wide enough will produce an image that is over center focused and not an accurate representation of what is in the mix.
Frequency Response
The frequency response of the room, this is a picture of the room’s health if you will acoustically. If it has a lot of peaks and valleys in it instead of something smooth and more even and more linear if you will, then you know, we have to look at these issues because these are all acoustical issues that translate into noise in our mixes. We want to minimize the frequency aberrations by selecting the proper room ratios and applying the correct treatment type and amounts to the correct surface areas.
Absorption / Noise
Sound absorption and noise management require two different technologies. Sound absorption is for treating inside the room. Sound absorption and sound diffusion are technologies that must be taken into consideration for any recording studio design or music studio design. Noise technology is for keeping noise inside the room from leaving the room. It also works the other way in keeping the noise from outside the room from getting inside the room. These are different sciences that require different methodologies to treat. Noise technology deals with mass and density where absorption and diffusion technologies are dealing with reflections and pressures.
Correct Room Dimensions Are Key
In our recording studio design or music studio design, we have focused on some of the things that are problem areas and how to treat them. We must first start with the correct room width, height, and depth to minimize unwanted low-frequency pressure build-ups. Our next task is to manage the reflections inside the room itself depending on our usage. We can have a recording studio design philosophy or a music studio design emphasize. Whatever the chosen usage, we need proper size and room volume couple with the proper amounts and types of all frequency treatments.
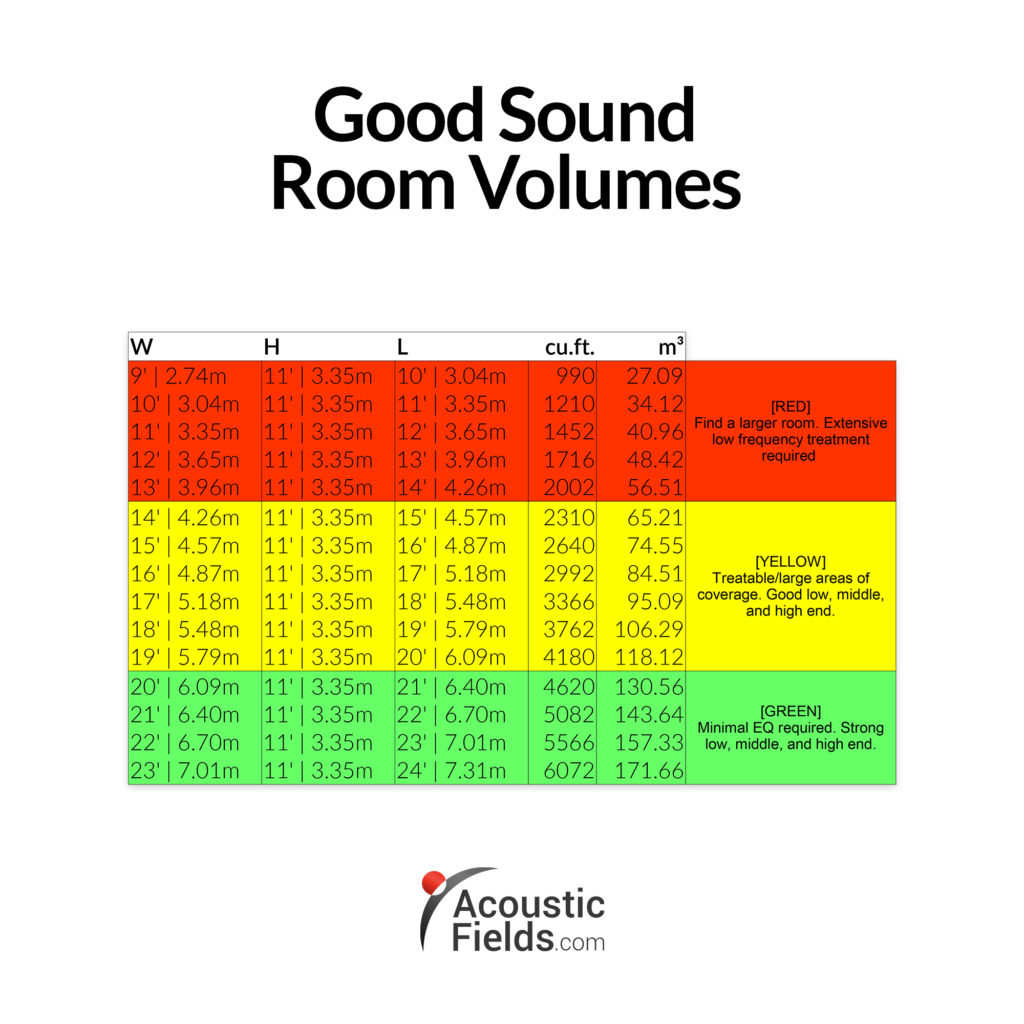
With the proper room dimensions we minimize pressure issues, we deal with critical distance, that distance between the direct and reflected energy from the room and therefore it influences the amount of treatment that you use. If you have a smaller room and you have large drivers then you’re going to need more low-frequency treatment. If you use proper room dimensions then you will need less low-frequency management addressing the lower frequency areas. Less management, fewer treatment results in less cost. Everything is related to everything else.
You get more sound also if you have proper room dimensions so that’s a real critical factor but you can achieve that with those proper room dimensions. Obviously that’s your great starting point and then you have less cost involved with it.
Measurement driven
All of your decisions in the process of building a recording studio design or a music studio design need to be measurement-driven. You must qualify and quantify all of your noise issues along with reverberation time management. Knowing what your issues are will help us design the proper treatment, types, and positions within the room to deal with all the measured issues. Knowing the issues and the treatment types, amounts, and materials required to treat will assist us with our cost analysis. Your problems may be too great for your budget. You may have to downsize your room to better fit within your budget restrictions. Proper dimensions and the room volume go a long way for your treatment needs giving you more sound and costing you less money and if you apply some measurements to the situation you can go a long way to getting a good sounding room.
One Size Definitely Does Not Fit All
From all of our discussions on recording studio design or music studio design, we must realize that one size does not fit all. One room size for all usages whether a recording studio design or music studio design will not work. You must decide your usage and match the energy requirements of your usage to your room size and volume. There are volumes and dimensions of rooms that will simply not work, so one size does not fit all and if people are telling you that, they’re misleading you.
Each room size and each room usage has particular requirements. The size and volume of the room matters especially for low-frequency energy management and reflection control and our critical distance element. With noise treatment, don’t confuse the treatment of energy within the room with noise from outside the room, they’re completely different approaches, completely different technologies. A lot of companies would like to tout their sound-absorbing treatments as noise and soundproofing technologies, it’s just simply not true. With room goals and usage, a little bit of planning upfront, determining what you want out of the room, what are your goals, what are your acoustic goals in the room will determine how you’re going to use the room and thus the treatment, size and volume of the room.
In Summary
I hope this discussion on recording studio design and the principles that we follow has been of use. If you want to learn more about this subject, please sign up for our free room acoustic treatment videos and ebook which provide step by step instructions on all major room acoustic issues. Get instant access by signing up now.





Hello Dennis, is it possible for you to do a room analysis for a room that’s not built yet? Meaning could you tell me what is needed in the construction of the walls for a control/mixing room if I sent you the dimensions? Iso clips vs QuietRock?
Hi Tyquan,
The first rule of acoustics is to do no harm. You must determine usage which you have done. For a control room, noise levels from external noise sources must be addressed. Once you quantify noise, you must design the suitable barrier. The mass and design of the barrier must match the frequency and amplitude of the noise. Your next task is to design the treatment inside the control room. You must manage the low frequency energy first and that can be done inside the walls themselves so you do not have a bunch of low frequency absorption sitting around. Both the barrier and the internal room treatment must be designed before any building occurs. The last thing you want is to build the treatment of the room without taking into account the external noise issues. You will have a treated room that you can only use at certain times because the noise level from external sources is too high.
I`ll definitely gonna buy your products when I´m finishing with my studiobuilding.
Great information.
All the best! Erik
Shall i ask for the Room dimension and volume i considered that’s its so important
Hi Mohamed, Fill out the information in this link: https://www.acousticfields.com/free-room-analysis/
I have a room in my house that is 18 by 12 and a ceiling height total of 88 I want to build a slightly smaller structure within those parameters. I would like to know what would be the optimal Dimensions as a starting point
T, The room is too small to begin with. Your ceiling height will produce many low frequency issues that you do not have the space to treat. Try for a 17′ width and a 23′ length to minimize the issues caused by 8′
I’m prepping to build a recording room into an a large garage (current dimensions 16’ wide, 16’ tall, 42’ long) with 2×6 insulated/sheetrocked walls and ceiling. I plan to build a “room within a room” style recording space decoupled from the building exterior walls. What would be a good size for this that could fit a 5-6 piece band? My initial thought has been to frame it up as 15’ W x 20’ L x 12’ H using 2 layers of 5/8” Sheetrock on each side of the walls of the inside structure but as this is a large undertaking I’d rather do it right the first time.
Any advice?
Hi Shaun, You need to get another width. Dimensions must vary by at least 25 %. Do not use drywall in your build. It has a negative impact on middle frequencies. You can build low-frequency management into the walls or use freestanding units. Fill out the information in this link: https://www.acousticfields.com/free-room-analysis/ Lets discuss your options by phone.
Dennis,
I had recording studios in the early 80’s…(analog) I didn’t find successful “mixes” until I hired an Acoustic Engineer to recommend materials while “TUNING” our rooms.
We are considering building a NEW studio (commercial) from the ground-up in the beautiful Hill Country. If we decide in the very near future to begin…are you available for hire to consult. And would you have sources for Architectural design?
Blessings,
Vic Q
Vic, Yes, we can assist you with both treatment and noise issues.
Building a recording studio within a large shop up in Oregon. Ceiling height I’m figuring on 11 ft.
Thinking of 20 ft. wide, by 28 long, divided into conrol room and ‘live’ room.
Walls to be non parallel. Looking for input before we start exterior walls.
D, Fill out the information in this link: https://www.acousticfields.com/free-room-analysis/
I work at a church and I plan on filling out your Room Analysis once I get the dimensions of my sanctuary. I have noticed that in some places the sound is almost unbearably harsh while in others there is actually a sweet reverb. Can acoustic treatment help me to derive maximum benefit from the natural reflections of the room?
Reverberation times can be balanced throughout the church with proper treatments placed on the correct surface areas.